Are you trying to fix your WordPress website not updating right away?
Often users ask us why some changes they make to their site like a new blog post, widget settings, don’t appear right away. It is a common issue and very easy to fix.
In this article, we’ll show you how to easily fix a WordPress website not updating right away.
Why My WordPress Site Not Updating Right Away?
The most common cause of a WordPress site not updating right away is caching.
By default, many WordPress hosting companies enable their own caching systems which store a temporary copy of your pages to improve website speed and reduce server load.
Apart from that, you may also be using a WordPress caching plugin on your own which may not be configured properly.
Last but not the least, your browser may also store a cached version of your pages in temporary storage.
Normally, when you make any change to your WordPress website those cached versions expire, and you get to see your changes right away.
However, sometimes due to some configuration error this may not happen right away. In that case you will see the old version of that page for a while.
The most common symptom of this problem is new posts not appearing on the homepage of your WordPress website.
While you can still view the single post by clicking on the view post link from the WordPress admin area, you are unable to see it on the main page.
That being said, let’s take a look at how to easily fix this issue.
Fixing WordPress Website Not Updating Issue
You’ll start by first clearing the browser cache. For most users, this should fix the issue, and you wouldn’t need to proceed to step 2.
Step 1. Force Browser to Reload or Clear Cache
Sometimes your browser (specially Google Chrome) will show you a cached copy of your website instead of showing the new one.
To resolve this issue, you need to simply hit CTRL + F5 (or Cmd + R in Mac) buttons on your keyboard to reload the page.
This will ask the browser to reload the page by fetching a fresh version. In most cases, this would fix the issue for many users.
However, if that doesn’t work, then the next step is to clear your browser cache. In Google Chrome, click on the three-dot menu in the top right corner. From the menu, you need to go to More Tools » Clear Browsing Data.
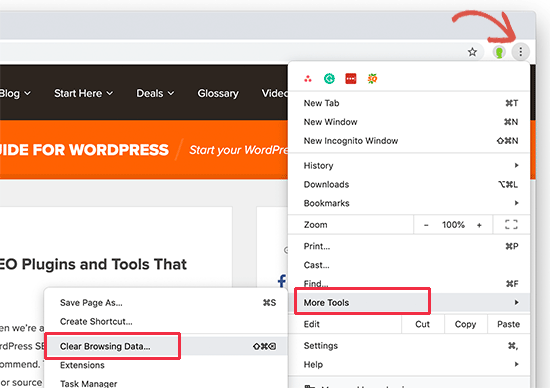
For more details, see our guide on how to clear cache in all major browsers.
Step 2. Clear WordPress Cache for Your Website
The second and most likely cause of this issue is poorly configured WordPress caching plugin. Most caching plugins make it super easy to clear your cache with the click of a button.
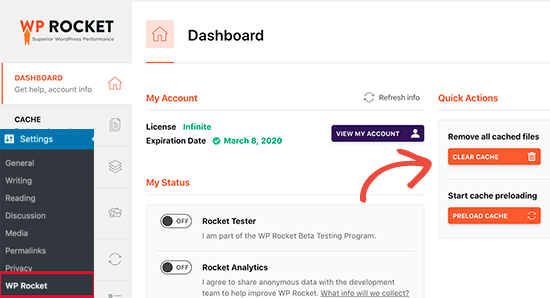
If you are using WP Rocket on your website, then simply go to the Settings » WP Rocket page and click on the ‘Clear Cache’ button under the dashboard tab.
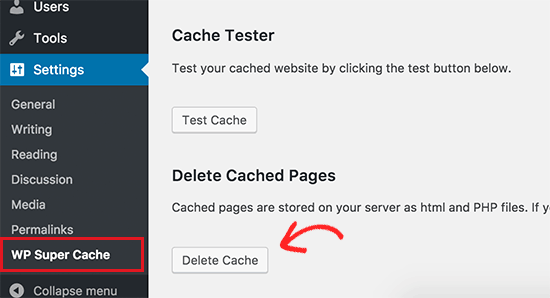
If you are using the WP Super Cache plugin, then go to the Settings » WP Super Cache page and click on ‘Delete Cache’ button.
Even if you don’t have a WordPress caching plugin installed on your website, many WordPress hosting companies deploy their own caching system by default.
For instance, if you are on the Bluehost hosting platform, then you’ll notice a ‘Caching’ button in the admin toolbar.
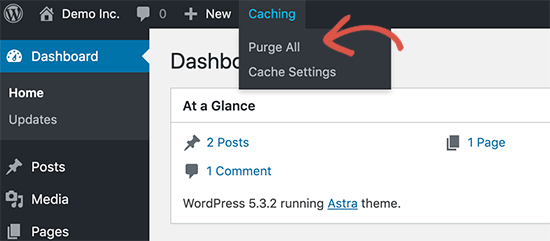
Take your mouse over and you’ll see the option to ‘Purge All’ cache. This will delete all cached files from your website.
SiteGround is another top WordPress hosting company that offers its own built-in caching system.
You can manage SiteGround cache by installing and activating the SG Optimizer plugin. For more details, see our step by step guide on how to install a WordPress plugin.
Upon activation, you need to click on the Purge SG Cache button in the WordPress admin toolbar.
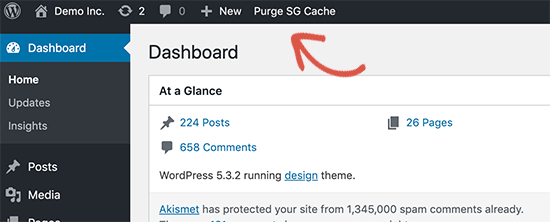
This will clear up SiteGround cache for your website.
For more hosting companies and caching plugins, see our complete guide on how to clear WordPress cache.


