Do you want to build an Etsy-like store with WordPress? Etsy is an online marketplace for creative folks who want to sell hand-made goods, artwork, and other unique items. However, it is a bit limited in terms of what you can do with your Etsy store. In this article, we will show you how to create an Etsy-like store with WordPress, and how to properly move an existing Etsy store to WordPress.
Here is what you will learn in this article.
- Etsy vs WordPress – Comparison of both platforms with pros and cons
- What you need to create a Etsy-like WordPress website
- Getting started with your own Etsy-like WordPress store
- Installing WooCommerce
- Moving an existing Etsy store to WordPress
- Choosing an Etsy-like theme
- Extending your store with extensions
- Mastering WordPress
Etsy vs WordPress – Which one is better?
Etsy is an online marketplace for creative folks. It allows you to sell unique, handmade, or custom-made products to a targeted audience.
On the other hand, WordPress is the world’s most popular website builder. It allows you to create almost any kind of website imaginable, including full-fledged eCommerce stores.
There are two different types of WordPress platform. WordPress.com which is a hosted platform and WordPress.org which also called self-hosted WordPress. See the difference in our WordPress.com vs WordPress.org comparison.
Throughout this article, when we say WordPress, we are talking about the more popular, self-hosted WordPress.org platform. We recommend using WordPress.org because it gives you access to all WordPress features out of the box.
Etsy and WordPress both enable you to sell products online but which one you should choose? Here are some pros and cons of both platforms.
Pros and Cons of Setting up an Etsy Shop
Let’s take a look at the advantages and disadvantages of using Etsy to sell your products online.
Pros of Using Etsy
- Ease of Use – Setting up an Etsy store is very easy and does not require any technical skills. Simply upload your product listings, add your payment information, and you are good to go.
- Targetted Audience – Etsy has a large customer base of users interested in unique hand-made products, gift items, artistic and creative products, and more. Opening up a shop on Etsy gives you access to a marketplace with interested buyers.
- Security and Trust – Etsy takes care of payments and ensures product delivery. This has helped them build trust among both buyers and sellers.
Cons of Using Etsy
- Higher Fees – Etsy charges $0.20 per listing and 5% transaction fee on the sale price (not including shipping costs). They have increased transaction fee from 3.5% to 5% starting July 16th, 2018. If you are using PayPal, then there is also a payment processing fees.
- Lack of Control – You have no control on the platform, and how your products are featured. Etsy can remove a seller if they feel that seller’s products don’t meet their policies or seller fails to satisfy a customer.
- Limited Growth Options – As your business grows, you will be paying a lot more to Etsy with limited options to grow your own brand and business.
Pros and Cons of Using WordPress
WordPress is the best platform to build any kind of website. However, it has its own pros and cons that you would want to consider.
Pros of Using WordPress
- Complete Control – You have complete ownership and full control of your website.
- Unlimited Features – You can add any feature to your website by installing extensions. There are more than 55,000 free WordPress plugins that you can install.
- Unlimited Listings – You can add as many items to your shop as you want. There is no listing fees because you own and manage the platform yourself.
- Low Costs – There is no comission and no transaction fee on each sale. You will only pay a small fee to your payment gateway.
Cons of Using WordPress
- Website Management – You are responsible for managing updates and making backups. There are plugins that help you automate those tasks.
- Learning Curve – WordPress is fairly easy to use. However, from time to time you may need some help. There are plenty of WordPress resources to help you out.
To learn more about WordPress, see our complete WordPress review with detailed pros and cons of the platform.
That being said let’s take a look at how to create an Etsy-like store with WordPress.
Requirements for Creating an Etsy-like Store with WordPress?
Here are the things you will need to build your own Etsy-like store with WordPress.
- A domain name (This will be your shop’s address on the internet i.e wpbeginner.com)
- A website hosting account (This will be shop’s home and where all your files will be stored)
- SSL Certificate (You need this to accept payments)
- Your undivided attention for 30 minutes.
Ready? let’s get started.
Getting Started with Your Etsy-Like Shop in WordPress
Normally, a domain name will cost you $14.99 / year, website hosting $7.99 per month, and an SSL certificate around $69.99 per year.
This is a lot of money if you are just getting started.
Thankfully, the folks at Bluehost has agreed to offer WHOOPS.ONLINE users a free domain name + free SSL certificate, and a 60% discount on hosting. They are also an officially recommended WordPress and WooCommerce hosting provider, and one of the largest hosting companies in the world.
Basically, you can get started for $2.75 / month.
→ Click Here to Claim This ExcLusive Bluehost Offer ←
Let’s go ahead and purchase your domain + hosting + SSL.
First, you need to visit the Bluehost website and click on the green ‘Get Started Now’ button.

On the next screen, select the plan that you need (basic and plus plans are the most popular among WHOOPS.ONLINE users).
After that, you will be asked to enter the domain name for your website.
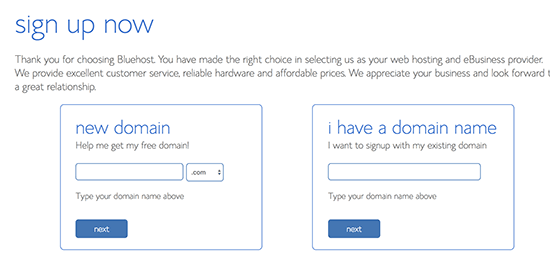
Need help choosing a domain name? See our beginner’s guide on how to choose the perfect domain name for your website.
Lastly, you will need to add account information and finalize the package info to complete the process. On this screen, you will see optional extras that you can purchase.
We don’t recommend purchasing these items because they will increase your hosting bill. You can always add them later if you think these are needed.
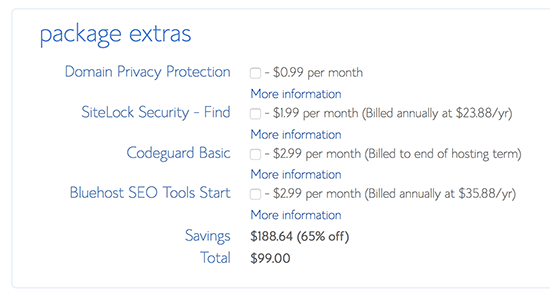
You can now go ahead and enter your payment information to complete the purchase.
After that, you will receive an email with instructions to login to your hosting control panel.
Bluehost will automatically install WordPress for you, and you will be able to login to your WordPress site directly from the hosting dashboard.
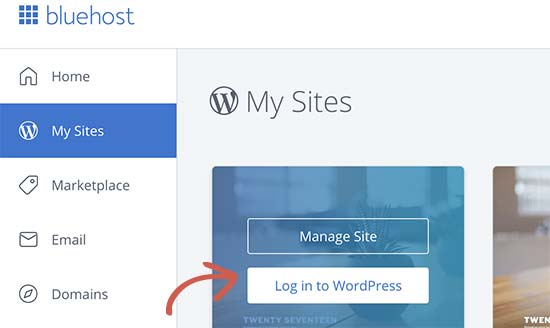
Once logged in, you will see the WordPress admin area. This is where you will manage your online shop, change settings, and add new items.
Installing WooCommerce on Your Website
Now that you have purchased hosting and installed WordPress, the next step is to turn your website into an online shop.
To do this, you need to install and activate the WooCommerce plugin on your website. For more details, see our step by step guide on how to install a WordPress plugin.
Upon activation, click on ‘Run the setup wizard’ button to quickly set up your WooCommerce store.
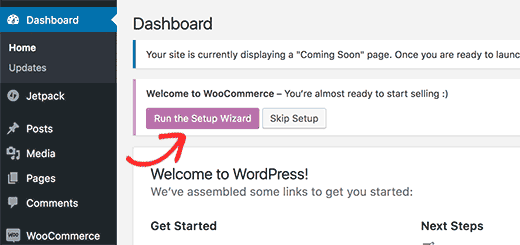
The setup wizard will guide you through the basic setup, installing pages, choosing payment services, and more.
Adding Items to Sell in WooCommerce
After setting up WooCommerce, let’s add a few items to sell on your online store.
Simply go to Products » Add New page to add your first item.
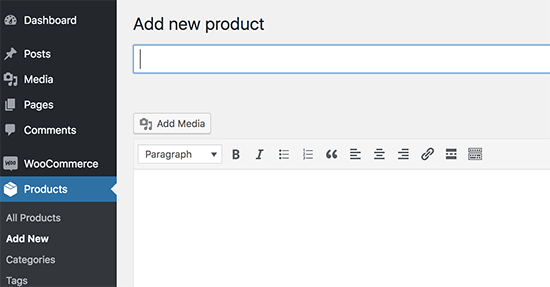
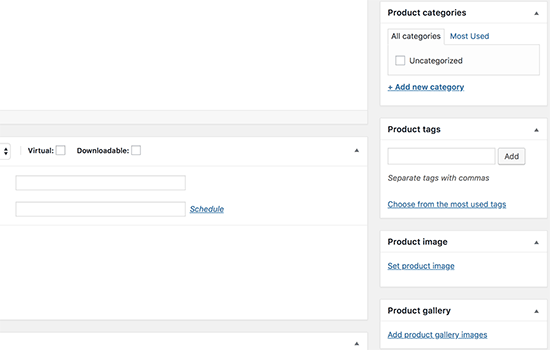
First, provide a title for your product and then some detailed description. On the right-hand column, you can add product category, tags, featured image, and gallery.
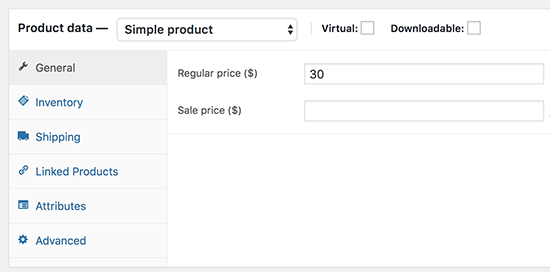
Below the description area, you will see ‘Product Data’ box. From here you can set product price, inventory, shipping, and other attributes.
Once you are satisfied with all the product information you have added, you can click on the Publish button to make it live on your website.
Repeat the process to add more products as needed.
Importing an existing Etsy Store to WordPress
Do you already have an Etsy store that you want to move to WordPress? In this section, we will show you how to easily import your Etsy shop to WordPress.
First, thing you need to do is install and activate the Easy Esty Importer plugin. For more details, see our step by step guide on how to install a WordPress plugin.
Upon activation, the plugin will add a new menu item labeled ‘Etsy Importer’ to your WordPress admin sidebar. Clicking on it will take you to the plugin’s settings page.
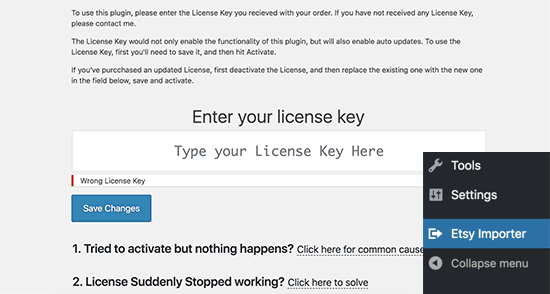
You will be asked to provide your license key. You can find this information under your account on plugin’s website.
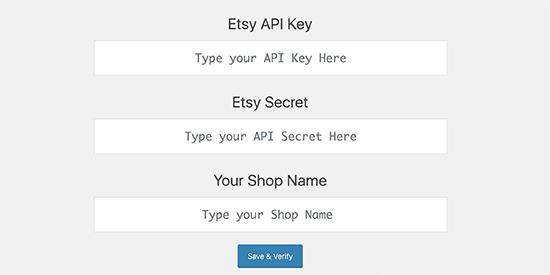
After activation, the settings page will ask you to provide the following information.
- Etsy API Key
- Etsy Secret Key
- Your Etsy Shop Name
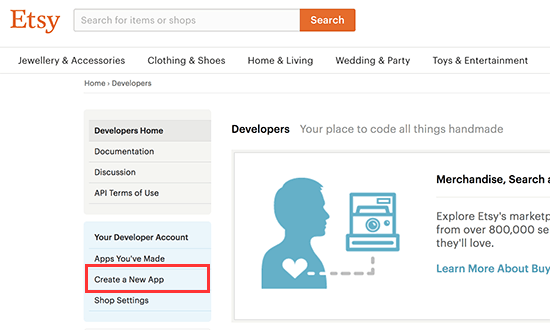
To get these API keys, you need to visit Etsy Developers website and then click on ‘Create a new app’ link.
This will bring you to a new page where you will be asked to provide a name for your app. You need to select that you are creating the app for yourself, and it will not be used for commercial purposes.
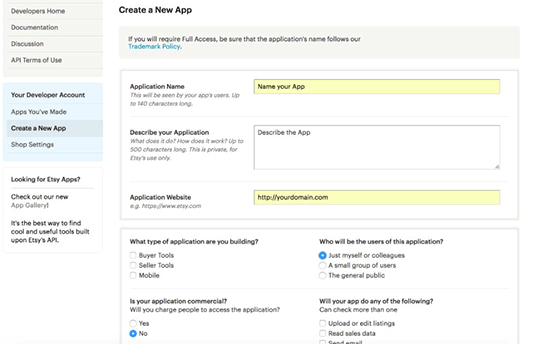
After that, click on ‘Agree to terms and create app’ button.
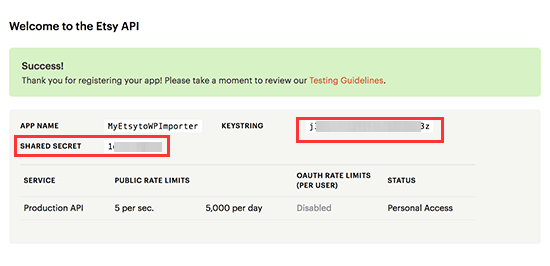
You will now see your app information page. From here you need to copy the Keystring and Shared Secret keys.
Now, switch back to the Easy Etsy Importer plugin’s settings page. After entering your API keys, click on the ‘Save & Verify’ button to continue.
This will take you to the Etsy website where you will be asked to allow access to the app. Click on the ‘Allow’ button to continue.
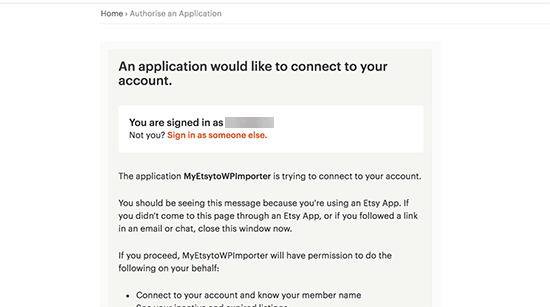
The plugin will now try to connect to your Etsy shop, and it will show a success message.

Next, you need to switch to the settings tab. The default settings will work for most websites, but you can still review and change them as needed.
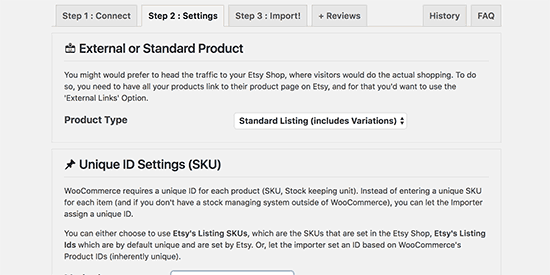
Don’t forget to click on the save button to store your settings.
Now you can move to the ‘Import’ tab. The plugin provides you options to selectively import item or import all listings. The default settings will work for most websites, so you can just go ahead and click on the ‘Import’ button.
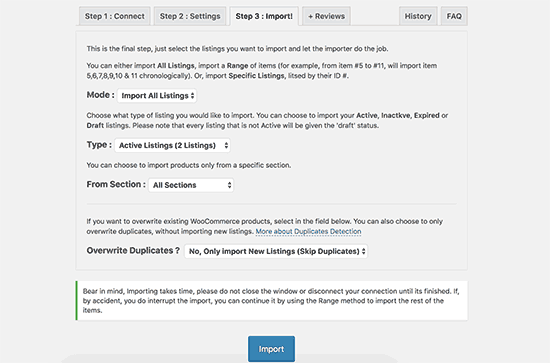
The plugin will now start importing your Etsy listings to WooCommerce. Once finished, you will see a success message, and you will be able to see the imported products under Products » All Products page.
Next, you can switch to the reviews tab to import your Etsy reviews to WooCommerce.
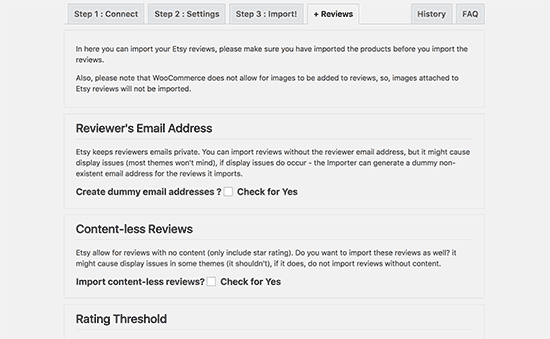
Congratulations, you have successfully imported your Etsy store listings to your WooCommerce website.
Choosing an Etsy-like WordPress Theme for Your Store
WordPress gives you access to thousands of free and paid website designs that you can use. These designs are called WordPress themes.
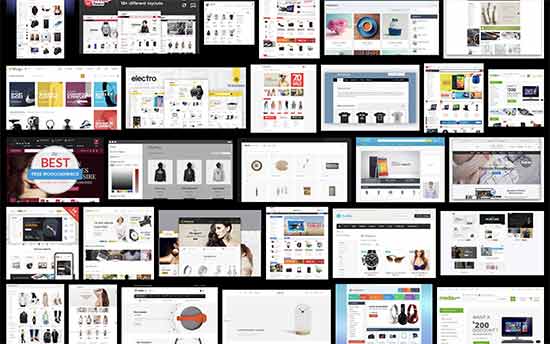
Each WordPress theme contains various template files to give your website a beautiful design. Using WordPress themes requires no coding or programming skills, and each of them comes with different options that you can use to customize your theme.
Due to such large variety of WordPress themes available, often users feel overwhelmed by the choices. To make it easier, we have hand-picked the best WooCommerce WordPress themes that you can use on your website.
The list contains both free and paid WordPress themes and all of them are mobile ready.
You may not a find a theme that looks exactly like the Etsy website, however you can find a theme with the same design qualities and then use theme’s settings to make it look more similar.
Need more help? See our beginner’s guide on how to choose the perfect WordPress theme for your website.
Extending Your Store with WordPress Plugins
Unlike Etsy, you have full control of your WordPress store. You can modify it in any way you want with the help of thousands of WordPress plugins.
Plugins are like apps for your WordPress website. You can install them to add new features to your website like contact forms, Google Analytics, and more.
With more than 55,000 plugins, you can easily find a plugin for almost anything.
Here are some of the plugins that we use on all our websites.
- WPForms Lite – Add contact forms to your WordPress site
- Yoast SEO – Improve your WordPress SEO and get more traffic from Google
- MonsterInsights (Free) – Helps you track visitor stats using Google Analytics
- WP Super Cache – Improves your website’s speed by adding cache
- UpdraftPlus – Free WordPress backup plugin
- Sucuri – Free website malware scanner
There are also tons of plugins made specifically for WooCommerce. See our list of the best free WooCommerce plugins. You can also use drag & drop page builder plugins to further customize your website look.
Mastering WordPress Skills
Now that you have a WordPress powered online store, you may want to expand your website by adding new features and growing your business.
WHOOPS.ONLINE is the largest free WordPress resource site in the world. We have tons of articles, videos, and step by step tutorials to help you take your website to the next level.
Here are some of the handy resources you will find on WHOOPS.ONLINE, all of them are completely free.
- WHOOPS.ONLINE Blog – This is where we publish our WordPress tutorials, how-tos, and step by step guides.
- WHOOPS.ONLINE Videos – These step by step videos will help you learn WordPress FAST.
- WHOOPS.ONLINE on YouTube – Need more video instructions? Subscribe to our YouTube channel with more than 102,000 subscribers and 10 Million+ views.
- WHOOPS.ONLINE Dictionary – The best place for beginners to start and familiarize themselves with the WordPress lingo.
- WHOOPS.ONLINE Blueprint – Check out plugins, tools, and services we use on WHOOPS.ONLINE.
- WHOOPS.ONLINE Deals – Exclusive discounts on WordPress products and services for WHOOPS.ONLINE users.
You can also use Google to find tutorials on WHOOPS.ONLINE. Simply add ‘wpbeginner’ next to your search term, and you will find answers to all your WordPress questions.


