Are you trying to fix the WordPress SEO crawl budget problem?
SEO crawl budget is the number of times search engines will crawl pages on your website. A lower crawl budget can delay your pages from getting indexed in a timely manner. This can hurt your SEO rankings and lower your overall traffic.
In this article, we’ll explain the WordPress SEO crawl budget problem and how to fix it quickly.
Because this is a huge topic, we have broken it down into easy-to-understand sections. Here are the different items we’ll cover in this article:
How Does Search Crawling work?
Search engines like Google, use sophisticated bots (computer programs) to visit websites across the internet.
These bots look for changes on a website and compare them to the main search index.
If they discover new content, then they add it to the search index. If they find content that is already in the index but has changed, then they update the index with fresh content.
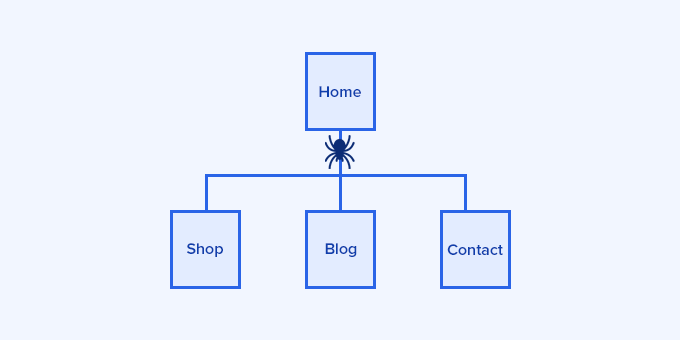
They follow links on a page and then do the same for those pages as well.
The way bots move from one link to other links on a page is similar to how real spiders crawl along their webs.
That’s why the term crawling is used to describe this activity, and you may sometimes see the bots referred to as search engine spiders.
For better SEO, you need to make sure that search engines can crawl your website easily.
Tip: See our complete WordPress SEO guide for beginners to learn more about SEO.
What is SEO Crawl Budget?
SEO crawl budget is the number of times search engines like Google will crawl pages on your website.
Google bots crawl billions of pages each day. They try to calculate how many pages they will crawl on each website domain to efficiently use resources.
This number is automatically determined by the crawling algorithms based on multiple factors.
It fluctuates daily, which means there is no fixed number for how many pages the Google bot will crawl on your WordPress website.
Generally, larger websites with more content have a higher crawl budget, and smaller websites have a lower budget.
Other factors also influence the crawl budget, like the popularity of a URL, freshness, update frequency, and more.
However, due to several reasons, you may be losing your crawl budget on unwanted pages.
For instance, if your website isn’t properly optimized, then search engines will spend your crawl budget on less significant parts of your website than important content.
What Causes WordPress SEO Crawl Budget Issues
The way WordPress generates URLs and duplicate content can cause crawl budget issues.
For instance, WordPress automatically generates RSS feeds for different areas of your website.
There are RSS feeds for the main blog, categories and tags, comments on each individual post and page, and even custom post types have separate RSS feed URLs.
Links to these RSS feeds are added to the HTML source code of your website which makes them discoverable by search engines.
Now, search engines are smart enough to recognize duplicate content and ignore it. However, they would still crawl them and spend your SEO crawl budget.
Apart from that, search engines would crawl less important items a lot more than needed. This includes your archives, taxonomies, authors, PDF files, and more.
WordPress plugins or other third-party tools can also add query parameters to your WordPress URLs.
Google’s spiders may consider these query parameters to be a different page and crawl them.
For instance, UTM parameters are used for Google Analytics tracking and a page with or without these query parameters would still look the same.
Example: https://yourdomain.com/landingpage/?utm_source=newsletter
This wastes your SEO crawl budget on less important items and becomes an issue.
How to Calculate Your SEO Crawl Budget
The SEO crawl budget is not a set number of pages.
It fluctuates a lot, and there is no reliable way of predicting how many pages Google will crawl on your website on any given day.
However, you can get a pretty decent idea based on recent crawl activity to see how Google crawls your website.
If you haven’t done so, you first need to add your website to Google Search Console. It is a free tool provided by Google to help website owners find out how their website is doing in Google Search.
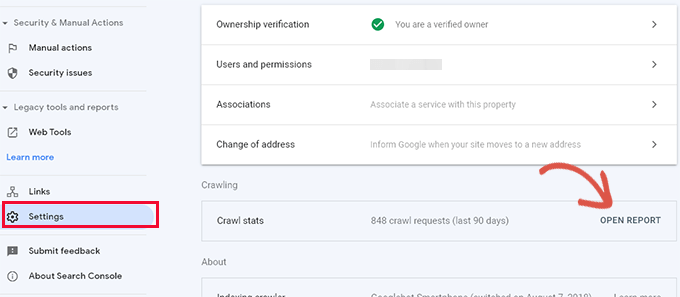
Simply go to your Search Console dashboard. Switch to the ‘Settings’ menu from the left column and then click on ‘Open Report’ next to ‘Crawl stats.’
The Crawl stats report will show an overview of crawl requests on your website during the last few weeks.
You can hover your mouse over the chart to see how many pages were requested each day.
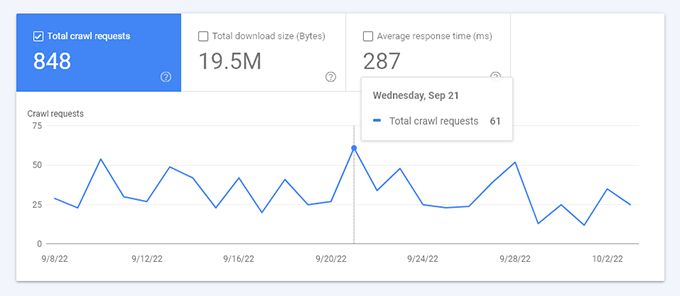
This gives you an idea of what the average crawl rate was on your site during this period of time.
Below that, you can see a breakdown of crawl activity by response code, file types, purpose, and Google bot type.
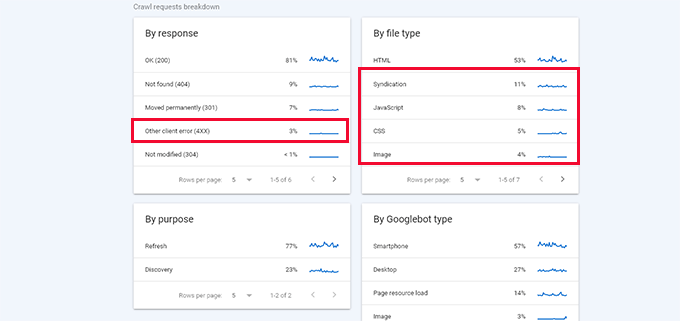
From here, you can see how much the crawl budget is spent on errors, syndication (RSS feeds), JavaScript, CSS, Images, and more.
This gives you a snapshot of items that you can optimize to utilize the SEO crawl budget more efficiently.
For example, if you have a lot of 404 errors being crawled, then you can use a redirection plugin to ensure those crawlers land on useful content.
(Later in the article, we show you how to redirect crawl errors step-by-step.)
Why You Should Care About SEO Crawl Budget
Search engines need to crawl your website efficiently, so they can properly index your content on time.
However, if your SEO crawl budget is being wasted, then your important and newer content may not get crawled on time.
It may even take weeks for the search engines to notice updates to your older articles or discover your new content.
You will miss out on getting traffic from search engines, your SEO rankings may not improve, and you will definitely lose money on sales or ad revenue.
How to Easily Optimize SEO Crawl Budget in WordPress
The easiest and safest way to optimize your SEO crawl budget in WordPress is by using All in One SEO for WordPress.
It is the best WordPress SEO plugin that comes with an SEO crawl optimization tool built-in.
First, you need to install and activate the All in One SEO for WordPress plugin. For more details, see our step-by-step guide on how to install a WordPress plugin.
Note: There is also a free version of All in One SEO which also includes a crawl clean-up feature. We recommend using the PRO plan of the paid plugin because it will also give you access to the Redirection manager tool to fix 404 errors on your website.
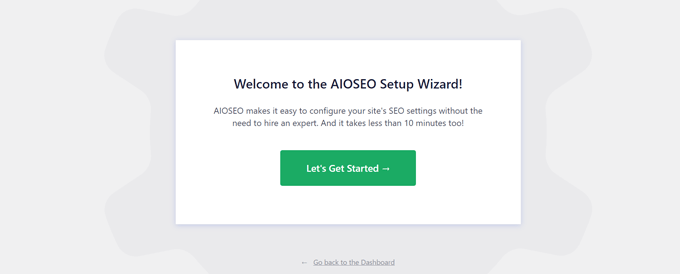
Upon activation, the plugin will show you a setup wizard. Simply follow the on-screen instructions to set up the plugin.
After that, you can go to All in One SEO » Search Appearance page.
Then, just switch to the Advanced tab.
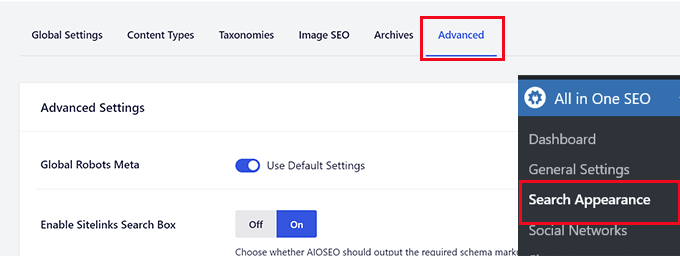
Scroll down to the bottom of the page and there you’ll see the ‘Crawl Cleanup’ option.
Click the toggle to enable the ‘Crawl Cleanup’ feature.
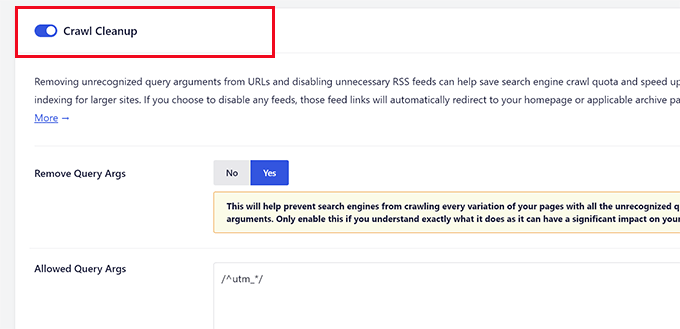
The first option you will see in the crawl cleanup is to remove the query arguments.
Below that, you can provide a list of query arguments that you want to allow. Advanced users can use Regex regular expressions here.
Next, you’ll see options for WordPress RSS feeds. All in One SEO will show you all different kinds of RSS feeds generated by WordPress, and you can disable the less important RSS feeds.
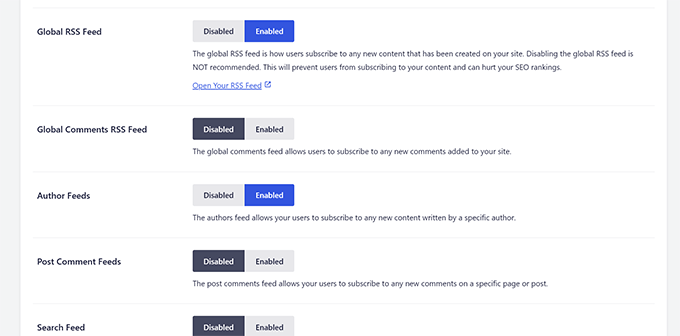
For instance, if you have a single-author blog, then you can Disable the Author Feeds.
Once you have disabled all the unwanted RSS feeds, don’t forget to click on the ‘Save Changes’ button to store your settings.
How to Set Up Redirects for Error Pages
All in One SEO will automatically set up redirects for feeds you have disabled. For instance, a tag RSS feed will now redirect users to the tag archive page.
Next, you need to switch to your Google Search Console dashboard and open the crawl stats report.
From here, you can see the pages that resulted in errors.
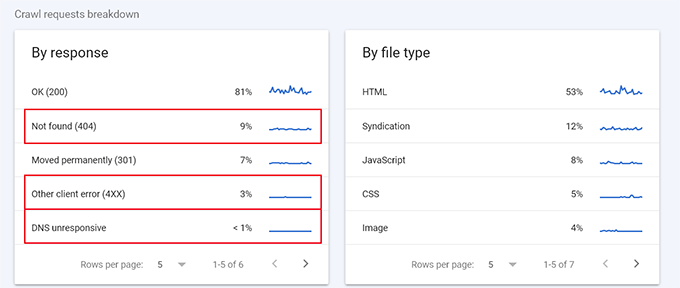
Now depending on the status code, you can set up redirects for those pages.
For instance, you can redirect 404 errors to a similar page. You can check other pages with errors and set up redirects for them as well.
All in One SEO makes it very easy to set up redirects on your WordPress website. Simply go to All in One SEO » Redirects page and add the old URL under the ‘Source URL’ and new URL under the ‘Target URL’ field.
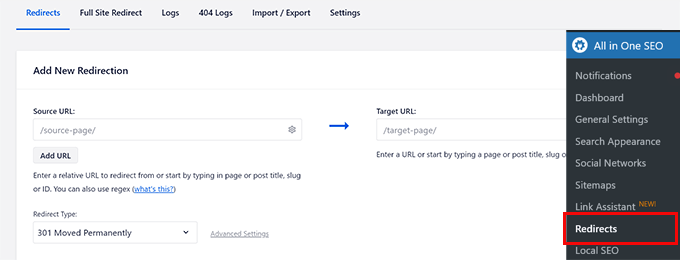
Click on the ‘Add Redirect’ button to save your settings. Then, you can just repeat the process to set up more redirects as needed. For more details and alternate methods, see our guide on how to set up redirects in WordPress.


